Preparing a Vegetable Plot
Choosing the Site
Growing your own vegetables is becoming more popular. During World War II the country was told to 'dig for victory' so every patch of suitable ground was used to produce the crops to feed the nation. This reduced the quantities which up until then were imported and reduced the burden on the embattled shipping industry.
Not only is it a great and rewarding pastime, the crops are fresh, taste better and the vitamins and other benefits they contain, such as antioxidants, are more potent. Some of the crops come under the description of so-called Superfoods which contain higher proportions of these beneficial compounds.
Growing your own food makes you part of the increasing numbers of the Ooooby community - short for "out of our own back yard". This is the new term for people who raise some or all of their food themselves, joining the list of acronyms which some like to adopt. Another term used is Locavore which defines people who source their needs from home or local producers.
With the current concerns about climate change, any reduction in the journeys taken by our food will reduce the effect we have on the environment. It has been estimated that all of the ingredients which make up the average family Christmas, clock up about 48,000 miles (that's twice the circumference of the Earth). These 'food miles' all contribute to our carbon footprint, so as well as cutting down on the energy we use directly, growing some vegetables in the garden is another way of doing your bit to combat global warming. Even when buying organic produce the food miles are a consideration, many of them travel great distances before they reach the shops. Some are imported from the other side of the world, while the locally grown crops are cultivated with machinery then go to be packaged and to a central dispatch depot before they are distributed to the supermarket.
The cut flower market clocks up even greater mileage so if you like to have a display indoors, set aside a small area to grow some flowers for cutting. This could be an area being left fallow as part of a crop rotation cycle.
Long before official allotment sites were available for the landless to grow their own food, some people used what they regarded as common land. After the English Civil War in the seventeenth century there was a food shortage and a group known as the Diggers took it upon themselves to take over plots of land to grow fruit and vegetables, as they believed large landowners were misusing it. To-day there are 'new' Diggers who use areas of derelict land to grow crops.
Allotments have been around since the eighteenth century and are supported by Acts of Parliament that control the size and the rent which should be paid, eg. the rent for a 10 rod plot was about £20 per year in the late 1990's. There is a renewed interest in allotments and it is more likely to be younger people from the 'professional classes' who are signing up for growing their own, rather than the traditional image of the flat-capped, retired labourer of old. Infact the majority of new allotment holders in Northern Ireland are women (approx. 60%) and most sites have waiting lists.
Even our politicians are getting in on the act. Much publicity has been sought to inform us that the Prime Minister, Gordon Brown, has a vegetable plot at No.10 with some the produce being sold in the staff canteen - typical Scot. Mind you it is maintained by gardeners from the Royal Parks, so you won't find Gordon creeping around with a torch at night collecting Slugs!
One council allotment officer estimates that it requires 16 to 20 hours per week to keep the average plot in good order during the peak growing season. He also suggested that to show some sense of competence, applicants should not arrive at his offices wearing stillettos if they want to have any chance of obtaining a plot! So if not familiar with some hard work or would not be able to commit that amount of time to a vegetable plot, it may not be the route to take - or consider sharing with a friend or two. Visit any allotment site and there are numerous plots which have been abandoned, much to the annoyance of the other tenants who have to suffer the weeds and pests they harbour.
Some large landowners are responding to the shortage of small growing plots and are making land available. Near to Gateshead in north-east England, the National Trust has cleared an old walled garden at a stately home for use as public allotments.
If growing vegetables at home with restricted space, you can try a few among the flowers. Clear a small patch or two and sow some lettuce, beetroot or spring onions - or try using large containers. A Potager can be a neat way to add vegetables to the ornamental garden. A series of beds are laid out in a formal pattern with stones or low hedges around their edges and the vegetables can be planted within these boundaries to some sort of design. Colourful varieties of many vegetables are available, eg. bright red or yellow chard and peas with purple pods.
Not all ground is suitable for growing food. It is important to consider any previous activity which may have left a residue of contaminants. If the area has been used for burning rubbish there could be some dioxins which are combustion products of plastics and electrical equipment, also unsafe levels of heavy metals from paints and some printed material.
Vegetables require an open position with full sunshine for much of the day, but with shelter from strong winds. Yields can be increased by about 30% in a sheltered spot. As a general rule a barrier will reduce the wind speed by about 50% for about eight times its height, so if a hedge is 2 metres high, crops at ground level up to 16 metres away should benefit significantly from it. The barrier should be porous, allowing about 50% of the wind to filter through, a solid structure diverts the flow, but can cause eddies which swirl around behind it.
The aspect of the site has a bearing on growth rates. The ideal aspect would be south-facing with a gentle slope which would warm up quicker and is sheltered from North winds. A slope is also less likely to be affected by spring frosts as cold air flows downhill. A barrier at the bottom of a slope could trap the cold air creating a frost pocket, a gap at the base allows it to pass through.
Most people try to grow their vegetables by organic methods or at least with the minimum of chemical interference - maybe the odd slug pellet or some artificial fertilizers. You may wish to be even more adventurous and follow the Biodynamic methods or create a Permaculture Garden which is in harmony with the environment.
Preparing the Site
When preparing a vegetable plot it can be very daunting - faced with a blank piece of ground usually infested with weeds. Some of these weeds are edible as well and can be harvested to supplement your more cultured crops. Often an allotment will have been neglected for a few years as the previous tenant may not have been able to tend it, but hung on to it in the hope that they might return. A good way to tackle the work is to divide it into four areas for rotating annual crops plus one for more permanent planting such as rhubarb, herbs and soft fruit. Crop rotation is important to reduce the build-up of pests and diseases, also crops use up the nutrients differently so they can be depleted if the same one is planted repeatedly in the same place.
On restricted sites, or a more relaxed attitude to growing, a system of polyculture can be followed where there is not a formal division of beds, but the position of a crop is determined by the maturing and harvesting of the previous one. This is what happens in the Permaculture growing method.
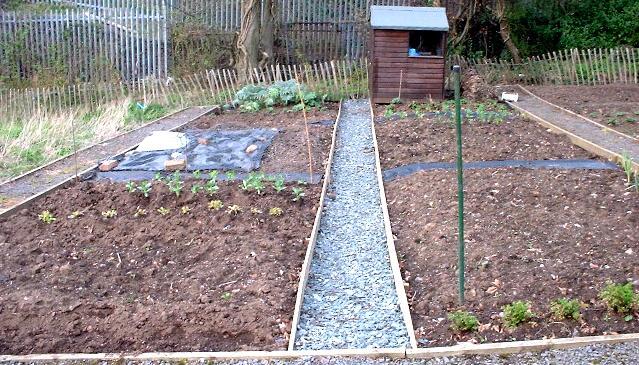
Make a path through the centre, wide enough to accommodate a wheel barrow and edged with gravel boards or scaffolding planks. If the site is fairly level landscape fabric can be used to keep it from being muddy in wet weather, but on a sloping site it would be better to cover this with bark chips or gravel to stop it being slippery. Pea gravel will gravitate to the bottom of the slope. Broken quarry stone and dust known as 'blinding' binds well (sometimes called GAP 20 - General All Passing - ie. contains stones from 20mm to dust); if it is difficult to obtain, scattering sharp sand over gravel will bind it together. Then use more landscape fabric to make side paths running at right-angles to the main one, pinned down with wire hoops or plastic pegs. These can be moved to work with different planting configurations and to make cultivation easier.
The paths will also reduce the amount or trampling on the beds, so they may not need to be dug over again, apart from some light forking to turn in some manure. This forms the basis of the no-dig method of gardening where the organic matter is scattered over the surface and becomes incorporated during planting and by the worms.
One of the problems with developing a plot from weedy conditions or from pasture land is that there may be more pests such as Leatherjackets and Wireworms. These pests live on the roots of plants so when the weeds are removed they will turn on your crops. When cultivating the soil destroy any that are found, birds will help and Robins in particular tend to keep vigil as you work. Also there will be a reservoir of weed seeds which will take quite a few years to be depleted. Some can remain viable for over 20 years, but their numbers will be declining if they are not allowed to mature.
It is probably best to be planting in rows which run in a North-South direction, which gives maximum light and fewer shadows. Also if including a shed or greenhouse, these should be placed at the northern end to avoid shading any of the plot. If there are trees, large shrubs or a hedge nearby, their roots may extend into the plot. This will mean a loss of moisture and nutrients and the crops will suffer. Smaller roots which reach beyond the canopy can be severed to lessen the problem, but larger supporting roots cannot, so if possible choose another site. Once they have been removed a vertical barrier should prevent them from encroaching again.
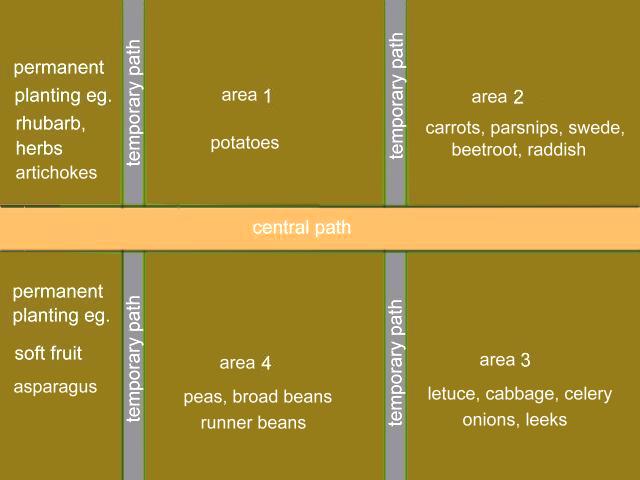
The diagram above shows a suggested layout for the first year. This will entail the addition of well-rotted manure or garden compost in area 1, as the potatoes require plenty of moisture and nutrition (Courgettes and sweetcorn are also gross feeders, so can be grown in this area as well). If the whole plot is large this could be the only area tackled in the first year, with a little work done on the rest. Cover any undeveloped areas with landscape fabric or old carpet laid upside-down to block out light which will kill the existing weeds and prevent others from germinating. This makes it easier to cultivate later. In subsequent years the rest of the plot gets the double digging as the crops rotate, until after the fourth year you are back at area one again, but this time the organic matter can be spread on the surface and incorporated with a digging fork. On a smaller plot the whole lot can be dug over at once before dividing into the different crop areas, incorporating organic matter in the relevant areas.
Most people would prefer to grow food without resorting to chemicals, but by suspending the practice for a few weeks, the clearing of a new plot can be made much less of an effort by employing a total weedkiller such as Glyphosate. It will kill all of the weeds and their roots, and it does not leave a residue so the ground can be used when clearing is complete. To ensure total removal leave the plot to see if any of the more stubborn ones are dead and reapply if they recover. This method will take longer than digging out the weeds, but is much easier on the back!
|
Grow Tasty Tomatoes Secrets to growing tomatoes, By a world authority who advises professional growers. |
Easy Gardening. A downloadable eBook on no-dig gardening. |
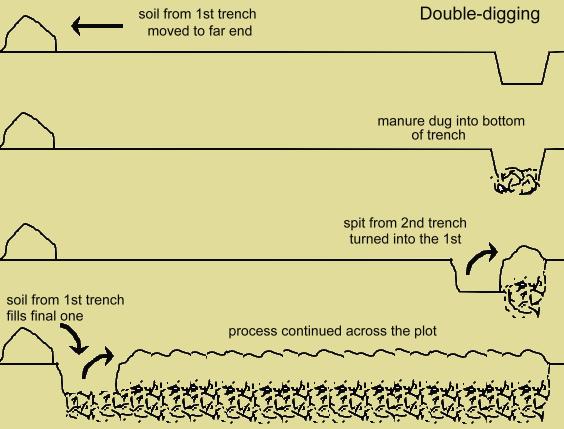
Remove all of the weeds, skimming them off with the spade if they are dense. Then dig over the area with a fork removing the remaining weed roots and large stones. To add the manure remove a trench of soil to one spade's depth at one end and move it to just beyond the far end. Dig the manure into the bottom of this trench, being careful not to bring the subsoil into the top layer, then turn the next row of spits on top of this. Repeat this along the area incorporating more manure and covering it with the turned over soil until the end when the soil from the first trench is used to fill the last. This is a process known as double-digging or as the gardeners of old called it 'bastard trenching' - for obvious reasons. If the ground has been cultivated before or is easily worked the double-digging can be performed during the clearing operations.
This may seem a lot of work but the resulting bed will give years of excellent production. If you are not accustomed to this kind of work, then it should be tackled in small segments over a number of weeks when the weather is suitable. The rest of the plot can be treated the same way later on or the following year, depending on its size and the energy of the gardener.
The following year use area 2 for the potatoes with the addition of the manure. In the second year area 1 is used for the rest of the root vegetables such as carrots, parsnips, beetroot and turnips which do better in ground that has not been recently manured.
The potatoes move to areas 3 and 4 in subsequent years then start again in area 1. This time the area does not require double-digging as the manure can be dug into the bottom of the trench made to plant the 'seed' potatoes. Thus the four year cycle begins again and moves around in the same manner. The crops to be planted in the rotation are as follows. This is the ideal cropping arrangement, but preparation of the plot may mean it is not established for a few years.
A simpler rotation can be followed on a three year cycle by including the potatoes with the root crops or leaving them out entirely if space does not allow. The choice of crops is for the individual, but the ones listed are fairly common.
| area 1 | area 2 | area 3 | area 4 | |
| year 1 | potatoes | lettuce, onions, spring onions, celery, (leeks)* | peas and beans, (leeks)* | carrots, parsnips, turnips, swede, raddish, beetroot |
| year 2 | carrots, parsnips, turnips, swede, raddish, beetroot | potatoes | lettuce, onions, spring onions, celery, (leeks)* | peas and beans, (leeks)* |
| year 3 | peas and beans, (leeks)* | carrots, parsnips, turnips, swede, raddish, beetroot | potatoes | lettuce, onions, spring onions, celery, (leeks)* |
| year 4 | lettuce, onions, spring onions, celery, (leeks)* | peas and beans, (leeks)* | carrots, parsnips, turnips, swede, raddish, beetroot | potatoes |
The permanent planting areas can be placed at the northern end to reduce shading of the plot. The choice of crops depends on taste and size of the area available but are the ones which remain for a number of years, eg. strawberries for about 3 and asparagus for up to 20 years. Preparation is the same as the rest of the plot. In subsequent years the area should be mulched with the manure to keep down weeds and the worms will work it into the soil. The non-cultivation or no-dig method of crop growing uses this technique over the whole plot. The soil is not dug, instead a thick mulch of compost or rotted manure covers the soil and the crops are planted through it. The initial preparation to clear the site is the same, as no amount of mulching will stop perennial weeds such as Couchgrass.
If there are periods when an area is not in production, eg.after harvesting a crop, it should be covered with a thick mulch of compost or with landscape fabric to prevent weeds from germinating - do not use plastic sheetng as it does not allow air in and the soil becomes stagnant. The compost will be taken into the soil by worms, so saving the need to dig it in the following spring. Another use for fallow areas is to grow a green manure. This is an annual crop such as mustard (spring or summer sowing) or alfalfa (late summer or autumn sowing). It will prevent soil erosion, smother weeds and improve the soil structure. Before the plants mature and still have plenty of sap, they are cut, left to wilt and turned into the soil at least two to three weeks before re-planting - roots and all, so that they are completely buried and will break down, returning nutrients to the soil. The soil structure is maintained better when it is being used, a plot left barren with nothing growing (even weeds) will become compacted and stagnant, growing roots keep it open.
Other green manures which can be grown in the winter are Corn Salad, Claytonia (Lamb's Lettuce) or Field Beans which do not have deep roots and are easily incorporated. Keep within the crop rotation principles by using varieties close to the harvested crop, eg. Field Beans after the peas/beans or Mustard after brassicas. Phacelia (Phacelia tanacetifoliais) is not related to any vegetable so can be used after any crop. Some of the seed which is sold for the purpose is used by commercial growers who use heavy machinery to incorporate the deeper roots and are not so suitable for use in the garden.
If the soil is not of a chalky nature it will tend to become acid as the Calcium is leached out. Also the addition of compost and manure tends to lower the pH. It may require the addition of lime from time to time as most vegetables grow best when the soil pH is between 5.5 and 7. Outside this range some of the nutrients can be unavailable to plants. It is preferable to do a pH test using soil from several areas of the plot to work out the amount of lime to add to achieve this optimum level.
| pH of soil | Sandy Soil g/sq m |
Loamy Soil g/sq m |
Clay Soil g/sq m |
| 4.5 | 190 | 285 | 400 |
| 5.0 | 155 | 235 | 330 |
| 5.5 | 130 | 190 | 260 |
| 6.0 | 118 | 155 | 215 |
of different soil types to achieve a pH of about 6.5.